- Try out Situm Mapping Tool before your first line of code
- Follow the tutorials and get comfortable with the code examples
- Know which LocationRequest you should apply
- Know which DirectionsRequest you should apply
- Implement all the typical navigation controls
- Enable Dead Reckoning and animate the user location
- Style your routes
- Adjust the user location to the route
- Re-compute route and redraw it as the user moves
- Use route segments to avoid drawing routes that belong to other floors
- Keep walking message
- When on route, indicate the floor where the user needs to go
- Show the current and next indication
Building your own wayfinding UX can be quite challenging. Integrating Situm SDK is pretty straightforward, but representing geospatial information in a nice way takes a lot of effort. This is why our first tip will be: don’t do it unless it’s absolutelly necessary!
At Situm, we provide Situm WYF, a full-featured plug & play wayfinding UX that will probably fill all your needs. Situm WYF includes a POI search bar, a floor selector, shows the building floorplans, animates the bluedot and the camera view as the user goes along the route… It is also highly customizable (e.g. you may adapt it to your look & feel).

Despite of this, you may still decide to build your navigation interface. Maybe you need a completely different look & feel or user interaction, or maybe you want to user your own cartography or map provider… If this is the case, we’d like to share a few tips with you that will help you to achieve a great user experience.
Try out Situm Mapping Tool before your first line of code #
Don’t start coding right away! Developing navigation interfaces may seem easy, but it’s not. It’s very important that you understand how Situm indoor positioning works and that you have tried it in a variety of situations.
To this extent, follow our Quickstart guide first. Start by deploying and testing Situm in a simple building (e.g. your home or office), making sure you’re able at least to retrieve positioning (even if it’s not accurate yet, don’t worry for the time being). Use Building Mode positioning for the moment. Move around and see how the bluedot follows you. Note how orientation changes with you as you move along.
When you’re comfortable enough, it’s time to deploy a few beacons and re-perform the positioning tests. Try to turn ON/OFF WiFi & BLE scanning to see the difference.
At this point, you’re ready to try in a more realistic environment. You should get the floorplans of a big building where you can do positioning tests: a hospital, a shopping mall, a big office… Ideally, the building should be as similar as the venue where you intend to deploy your application (e.g. if you’re building an application for hospitals, perform tests in hospitals). Deploy beacons, calibrate a sizable area (e.g. >3000m2) of at least 3 floors… and again perform positioning tests: start-stop positioning, walk around, take turns, change floors…
Now you may at this point play a bit with the Global Mode. Configure your building selector: you may try them all at this point to see their differences. In Situm Mapping Tool, make sure that you’re in the screen that shows all your buildings (as in Figure (1) here) and then start positioning. Does it detect the building where you are?
Now you’re ready to move on to the next step: wayfinding. First, create POIs & routes in your venue using Situm Dashboard. Then, in Situm Mapping Tool, try the POI search bar, click on a POI, retrieve a route and follow it. The route should be displayed on the screen and text turn-by-turn indications should be displayed. Moreover, as you move along the route both the route display & indications should update (or even re-compute if you go off-route!).
Follow the tutorials and get comfortable with the code examples #
Start by trying to follow the Quickstart guides. You should achieve a working example app that at least performs positioning and outputs the computed geolocations in a log.

Then, Make sure you follow and understand the Situm SDK tutorials (at least the Basic topics) and that you’re able to compile, execute and understand the code examples available in our Github (“All the code examples” section in the Figure above).
Know which LocationRequest you should apply #
The LocationRequest allows you to configure positioning and routing parameters respectively. Configuring them correctly is paramount to achieving a good navigation experience.
You may change the configuration of all these parameters within Situm Mapping Tool and perform tests in your venues. Some common recommendations are:
- Figure out which basic and advanced sensors you should use: WiFi, BLE, barometer…
- If your venue has outdoor areas, try all indoor geolocation modes and decide which one is best for you. Enable “Use Indoor GPS” as well.
- Enable Dead Reckoning to provide a smooth experience when the user turns.
- Enable the Locations Cache if your app will start & stop positioning frequently.
- Don’t enable the “Ignore WiFi Throttling options”. In wayfinding apps, your users are unlikely to perform the required configurations in their smartphones.
When you’re ready, make sure you understand how these options relate to the LocationRequest (everything is explained here).
Know which DirectionsRequest you should apply #
The DirectionsRequest allows you to configure how the navigation experience will behave. Here you have an explanation of the most important parameters, with links that explain how to test them in Situm Mapping Tool. Make sure that at least you configure:
- Threshold to goal (in meters): so navigation stops when you’re close to your goal.
- Threshold to out-of-route (in meters): so you may re-compute the route when the user goes off-route.
Implement all the typical navigation controls #
Good artists copy, great artists steal! So… steal as much as you can from Situm Mapping Tool, Situm WYF and our code examples.

Your application should at least:
- Show the building floorplans. It’s usually a good idea to user a basemap provider such as Google Maps or Mapbox.
- Show a floor selector so the user can change floors (Android example). It’s usually a good idea to highlight the floor where the user is as well as the floor that is currently shown (maybe using different colours).
- Show basic controls such as buttons to start / stop positioning & route (see Situm Mapping Tool for inspiration).
- Show a different icon for location and orientation:
- For location, usually you’ll want to display a “bluedot”. You may also display a circle a twice as wide as the Accuracy of the location returned by the SDK as in this example.
- For orientation, usually you’ll want to display an arrow. You should only display orientation when the bearingAccuracy is high.
- Allow the user to zoom-in & out, move the map, click on POIs… This is usually implemented out-of-the-box by basemaps providers such as Google Maps or Mapbox.
- Show a “Center View” button that, when clicked, centers the view automatically in the user location. As the user moves, the camera view should follow his location, unless the user interacts with the map (e.g. zooms out, moves the view to a different location…), in which case the location should still update as the user move but the camera should not center on it (until the user presses on the “Center View” button again).
Enable Dead Reckoning and animate the user location #
Situm SDK provides one location per second by default. Just displaying this location and updating it every second will not achieve a smooth user experience.
First of all, you should enable the Dead Reckoning mode to display smoothly fast orientation changes. This allows Situm SDK to compute more than one location per second when the user turns, therefore your app will be able to show them without 1 second delay.
Another important UX improvement is to animate the feed of locations provided by Situm SDK. If you just display a location per second, positioning will feel a bit jumpy and discontinous. However, if you animate it using the capabilities provided by your chosen basemap library, the experience will feel smooth and continuous. See this Android example.
Style your routes #
Routes are usually displayed as a set of lines (usually called a polyline). This example shows how to do it (Android, iOS). You’ll notice (see next Figure, left) that the polyline has been styled a little bit, but the result is not particularly attractive. On the contrary, Situm Mapping Tool breadcrumb style is nicer (next Figure, right). The different is just the design and style applied. Make sure you style your routes!


Adjust the user location to the route #
When the user moves along a route, you’ll notice that the location may not follow the route 100% (it may be off by a few meters). This is because Situm SDK provides user positioning anywhere, not only on top of the route. Adjusting the location to be exactly on top of the route yields a better user experience. You can do this easily as explained here.

Re-compute route and redraw it as the user moves #
It’s very important that your application detects when the user goes off-route and recomputes it if that’s the case. Luckily, Situm SDK does most of the heavy work for you.
Also, when the user starts the navigation, the user is usually long. But as the user moves towards the goal, the route left shortens. A good idea is that your UX reflects that fact. You may do this by redrawing the route left every time you get a new location, as the user moves forward. You may do this as explained here.

Use route segments to avoid drawing routes that belong to other floors #
One way to display a route is to draw a polyline that traverses all the route points. Routes traverse several floors, and a common mistake is showing points that belong to other floors. Or worse: imagine a route that starts in a certain floor (F0), then goes to another (F1) and then goes back to the original one (F0). When user is in F0, the naive approach would be to show all the route points in that floor. But that would be confusing for the user, since you’d be showing the end of the route (the final F0 path) before the intermediate part in F1.
Route segments help you in dealing with this situation.
Keep walking message #
When the user starts positioning, Situm provides a first location estimate after a few seconds with a certain accuracy. As the user walks around (e.g. 10-20 meters) error goes down to 1-5 meters in average. A detailed explanation can be found here.
Some users start positioning and “just wait” until positioning is accurate. This isn’t likely to render the best results: positioning gets accurate faster if the user walks. Therefore, it’s a good idea:
- While Situm SDK doesn’t provide the first location, show a message indicating that positioning is being computed. For example, Situm Mapping Tool shows a Toast with a spinner and a message that says “Looking for location”.
- When the first location is rendered, remind the user that he should walk to get a good location fix. For example, Situm Mapping Tool shows a toast that says “Obtaining position… Keep walking”. You may do something like this during the first seconds after positioning is initiated. Another way to do it is to show this message while the Quality of indoor location is LOW (Android, iOS, Cordova, React Native).
When on route, indicate the floor where the user needs to go #
When displaying a route that requires the user to move from one floor to another, it’s a good idea to indicate visually the floor to which the user needs to go. A nice way to do this is by showing an icon like the one shown in the following image (highlighted by a purple circle). Note that this icon indicates both that the user should go down and the floor to which he should go (1st floor). Another way to do this is to indicate it explicitly in the text indications (e.g. showing a message that says: “Go down to floor 1”).

Show the current and next indication #
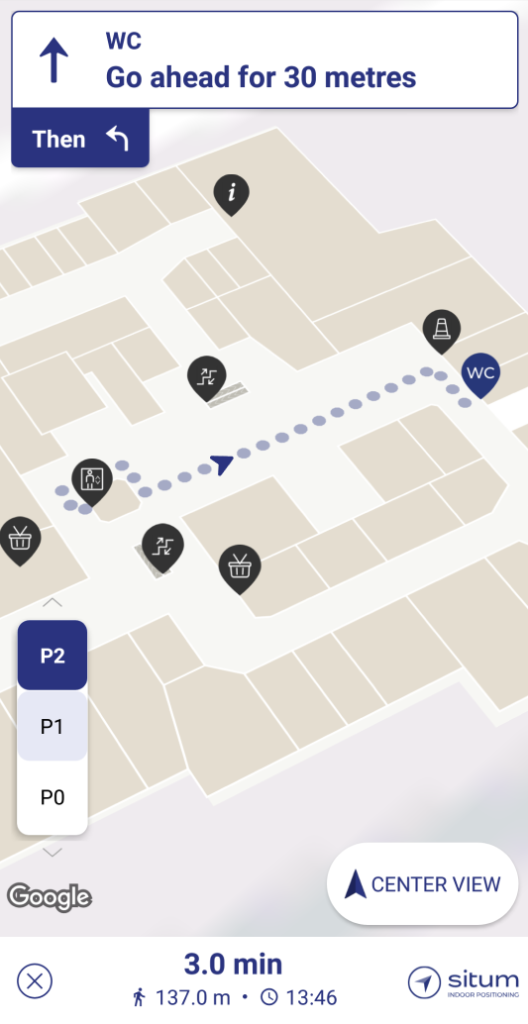
When you’re showing turn by turn indications to an user, you’ll notice that he doesn’t just look all the time to the screen, looking for the next indication to appear. Instead, a common behaviour is to memorize the indication and continue, just to look at the phone after a while.
Given this, it helps that you show not one, but two indications on the screen (three might be a lot…). Take the next image as an example. If we just show one indication, the user will only know that he has to “Go ahead for 30 meters”. And then, what? By showing a second indication, the user knows that then he needs to take a turn (and probably keep walking after that). That second indication provides a lot of context, so the user can walk freely without paying constant attention to the application screen.

To this extent, the information provided on the NavigationProgress will be very handy.

