The Settings Menu is available from the main screen of Situm Mapping Tool. On the main menu, you need to click on the Hamburger icon to show the left menu. Then, click on “Settings” and the Settings Menu will appear. This menu contains the following Settings Sections:
On the Settings Screen you can also reset the default values when needed. To achieve this, click on the three dots in the upper right corner and select Reset default values.
Positioning settings #
The Positioning Settings screen is divided in two areas: Basic Settings and Advanced Settings. It is important to take into account that any modification of the Positioning Settings will require to re-start the positioning.
Basic Settings #
The Basic Settings are always shown by default. Please use the following table as a reference:
| Settings | Description | Recommendation | Useful Links |
|---|---|---|---|
| Use WiFi | Use WIFI for Indoor Location. | Enabled | Indoor geolocation modes Sensor requirements |
| Use BLE | Use BLE for Indoor Location. | Enabled | Indoor geolocation modes Sensor requirements |
| Use Indoor GPS | Mixed GPS+WiFi+BLE to improve indoor positioning in open areas. | Enable it if your building has big outdoor areas (with good GPS coverage) within the floorplan boundaries | Calibrated Indoor GPS |
| Use barometer | Detects pressure changes to speed up floor transitions. Only enabled on mobiles that have this sensor. | Enabled | Sensor requirements |
| Global Mode | Enables the Global Mode, which allows to computing of both Indoor & Outdoor geolocations. | Enable it if you want to provide positioning in more than one building or anywhere in the world (outdoors). | Building detection: Global vs Building mode |
| Building Detector (only available with Global Mode enabled) | Detects (automatically) the building where the user is. 4 detectors are available: 1. GPS proximity: you will be detected in the closest building to your GPS location. 2. WiFi and BLE: you will be detected in the building whose WiFi and BLE signals (gathered from calibrations) match better the WiFi and BLE signals perceived by your smartphone 3. WIFI: similar to “WiFi and BLE”, but using WIFI only. 4. BLE: similar to “WiFi and BLE”, but using BLE only. | WIFI and BLE detector is recommended in most cases. | Building Detector |
| Show WiFi/BLE floating info | Shows WiFi/BLE scans. Also shows GPS SNR in Global Mode. With this, you can see the signal levels that the app picks up. | Enabled |
The following figure contains an overview of the settings as shown in Situm Mapping Tool:

Advanced Settings #
The Advanced Settings will be displayed if you click on the “Advanced Settings” drawer:
Main options #
| Settings | Description | Recommendation | Useful Links |
|---|---|---|---|
| Dead Reckoning | Sub-second orientation updates based on inertial sensors. Detects fast turns improving user experience | Enable always for a better user experience in wayfinding applications | Dead Reckoning in Situm SDK |
| Update locations interval | Time (in seconds) between consecutive location updates. This option does not affect the frequency with which location updates are calculated. It only affects the frequency with which they are communicated to the app, and therefore rendered by the GUI | We recommend the default value (1 second), which is also the fastest available. This will provide the best user experience. Change it only if you want to test how the user experience will look like by rendering fewer location updates. | Location Updates Interval in Situm SDK |
| Positioning update distance | Smallest displacement required (in meters) between consecutive location updates. After one location is communicated to the app, a new one will only be communicated if the user moves more than this value. Therefore, the user location will stall in the GUI until this minimum displacement takes place. Changing this value will not change the number of locations computed and therefore will not vary the battery consumption. | We recommend the default value (0 meters), to provide the best user experience. Change it only if you want to test how the user experience will look like by rendering fewer location updates. | Location Updates Displacement in Situm SDK |
| Indicate ground truth | If enabled, in the Positioning Screen you will be able to indicate where you are while you are positioning. | Enable it only if Situm Support Team has advised you to do so. This feature is intended for troubleshooting purposes: by telling us where you are, we can help you troubleshoot any positioning issues that may arise. | |
| Use locations cache | When the positioning stops, this mode saves the last location. When the positioning starts again shortly after that, it uses the last location (stored) as a hint on where the user might be. | Enable if your app stops & starts the positioning frequently (e.g. if your app stops the positioning when it goes to the background and starts it when it comes back to the foreground). This option will improve the user experience in this case. |
The following figure contains an overview of the settings as shown in Situm Mapping Tool:

Sensors #
| Settings | Description | Recommendation | Useful Links |
|---|---|---|---|
| Use gyro for orientation | Uses a gyroscope to estimate the user movement (particularly, the orientation). | Enable it always. Disable only for testing purposes. | Sensor requirements Gyro in Situm SDK |
| Use compass for orientation | Uses compass to estimate the user orientation. | Enable it always. Disable only for testing purposes, or if the compass is uncalibrated or if the environment interferences are harming the positioning accuracy. | Sensor requirements Compass in Situm SDK |
| Use a camera for indoor positioning | [option not available since 3.83.5 version](EXPERIMENTAL) If enabled, the app will use a Camera for indoor positioning. This mode is not compatible with all devices. | Disabled | “By foot” Visual Odometry motion mode in Situm SDK |
| Activate Bluetooth automatically | If enabled the BLE sensor will be turned on again even if the user turns it off during positioning. | Enable if there are beacons in the building. | Auto-enable BLE in SItum SDK |
| Ignore the WiFi throttling | If enabled, Situm will scan WiFi as fast as possible, ignoring all the Android 10+ WiFi Throttling restrictions. | Always enable it in Android 10+. Make sure that you have deactivated the WiFi Throttling. | WiFi Throttling explanation WiFi Throttling in Situm SDK |
The following figure contains an overview of the settings as shown in Situm Mapping Tool:

Tracking #
| Settings | Description | Recommendation | Useful Links |
|---|---|---|---|
| Use a Foreground Service | Prevents positioning from being stopped when the application is working in the background. | Enabled | Situm SDK Background execution |
| Interval to upload locations to Situm Platform | Allows to select the frequency at which the position will be uploaded to Situm cloud to monitor them in the RealTime panel. There are 6 modes: 1. Real-Time (1s interval) 2. Fast (5s interval) 3. Normal (15s interval) 4. Slow (25s interval) 5. Battery Saver (1800s interval) 6. Never (No locations will be uploaded to Situm Cloud) | Keep default value (5s) unless you want to save battery or don’t want to upload geolocations to Situm Cloud | Realtime update interval explanation Realtime panel updates in Situm SDK |
| Battery saver mode | If enabled, Situm will read the accelerometer data to decide whether the smartphone is moving or has been laying still for a while. In this latter case, most computation will stop (including reading sensor data) and the last known location will be repeatedly communicated to the app (and sent to the cloud, if the Update locations interval allows it). If the smartphone moves again, normal operation will be restored. | Enable it only if: 1) you want to use Situm Mapping Tool for tracking (people, vehicles, etc), and 2) you want to save as much battery as possible, and 3) there are long periods of time when the smartphone is still. | Battery Saver explanation Battery Saver in Situm SDK |
| Start positioning on app startup | If enabled, the positioning will start automatically when the app starts, in the building selected in the option “Building where positioning will start”. | Not recommended in general. Use this option only for tracking applications where you want to make sure that the app always starts in a certain building, without user intervention. | |
| Building where positioning will start (only available with Start positioning on app startup enabled) | Allows you to select the building where the positioning will start (automatically) if you enable the option “Start positioning on app startup”. |
The following figure contains an overview of the settings as shown in Situm Mapping Tool:
Outdoor Positioning #
| Settings | Description | Recommendation | Useful Links |
|---|---|---|---|
| Open Sky detector | If enabled, is able to detect whether the user is under roof or under open sky | Do not enable, feature not recommended. Use the Global Mode with an appropriate Building Detector instead. | Open Sky Detector Open Sky Detector in Situm SDK |
| Open Sky SNR configuration (only available with enabled) | SNR value of the GPS above which the user will be considered to be under the open sky (the higher the SNR, the better the GPS signal and therefore the higher the chance that the user is under open sky). | Measure the SNR at the transitions (between open sky and under roof) to adjust it. | |
| Location compute interval | Saves battery by disabling GPS readings for the given interval (in seconds) after every update. Necessary to have the Global Mode active. | Keep default value (0 sec). | |
| Location update interval | Interval (in seconds) between consecutive Outdoor Location update.Necessary to have the Global Mode active. | Keep default value (5 sec). |
The following figure contains an overview of the settings as shown in Situm Mapping Tool:

Wayfinding Settings #
The Wayfinding screen is divided in two areas: Basic Settings and Indications.
Basic Settings #
| Settings | Description | Recommendation | Useful Links |
|---|---|---|---|
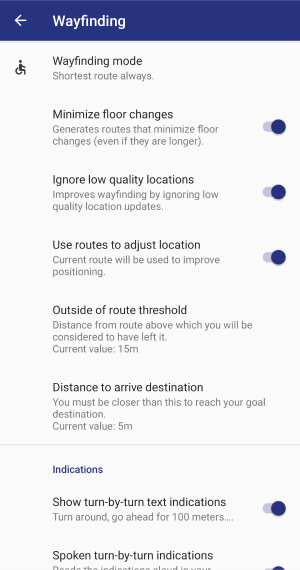
| Wayfinding mode | Allows to select the type of routes that will be computed: 1. Shortest route always: Computes the route that yields the shortest distance. 2. Only accessible routes (suitable for wheelchairs): retrieve the shortest route, but only from those that are suited for people with reduced mobility. 3. Avoid accessible floor changes (e.g. avoid crows in elevators): avoid floor changes that have been marked as “accessible”. | We recommend to use “Shortest route always” or “Only accessible routes”, depending on whether you want your routes to be adapted for people with reduced mobility or not. The option “Avoid accesible floor changes” should only be used if you want your users to avoid elevators. | Route types |
| Minimize floor changes | If enabled, this option forces the choosing of routes with the minimum amount of floor changes required, even if they take a bit longer than other route options. | We recommend to enable it. Minimizing the floor changes is the natural behaviour that the user expects, so this option enhances the user experience in general. In addition, in most buildings the shortest routes are also those that involve less floor changes, so this option will not do any harm in general. | Minimizing floor changes |
| Ignore low-quality locations | If enabled, Situm will not use locations to update the route (visualization, instructions, etc.) unless they have a minimum quality. The main effect is that poor quality locations will not cause an spurious re-routing. | We recommend to enable, but being careful. The experience will be more robust in general. However, if the positioning quality of your building is low (in general or in some areas), important geolocations may be missed and the wayfinding experience will be harmed. | Ignore low confidence locations |
| Use routes to adjust location | If enabled, the route that the user is following will influence the location computed. In a way, the route will “attract” the location, because the user is supposed to be following it to a certain degree. | We recommend to enable it, but begin careful. The experience will be more robust and visually appealing in general. However, take into account that if the user goes out-of-route on purpose, Situm will take a bit longer than usual to realize about this, and therefore to recompute a new route. | Adjusting the location to the route |
| Outside of route threshold | Minimum distance (in meters) between the user location and the route to consider that the user has gone off route. | 1. Small Building: 7 m 2. Mid-sized Building: 10 m 3. Big Building: 15 m (default). | Outside of route threshold |
| Distance to arrive destination | Distance (in meters) within which the user is considered to have arrived at the end of the route. | 1. Small Building: 7 m 2. Mid-sized Building: 10 m 3. Big Building: 15 m (default). | Arriving at your destination |
The following figure contains an overview of the settings as shown in Situm Mapping Tool:
Indications #
| Settings | Description | Recommendation | Useful Links |
|---|---|---|---|
| Show turn-by-turn text indications | Show indications like Turn around, go ahead for 100 meters… | Enabled | Turn by turn navigation and instructions |
| Spoken turn-by-turn text indications | Read the indications aloud in your smartphone’s preferred language. Available in English & Spanish. | Enabled | Turn by turn navigation and instructions |
| Interval between indications | If a new indication will be shown to the user (e.g. because he has advanced on the route), this indicates the minimum time (in seconds) that Situm will wait between the last indication and this new one. | 1. Small building: 0 sec. 2. Mid-sized building: 3 sec. 3. Big building: 3 sec. | Indications interval |
| Round indication steps | In the “Go Ahead” type of indications, distances will be rounded up to this value (in meters). | 1. Small Building: 0 m 2. Mid-sized Building: 5 m (default) 3. Big Building: 10 m | Types of indications Round indication steps |
| Distance to change indication | Distance (in meters) within which the user is considered to have arrived at the next step in the route. Upon this arrival, the next indication will be shown. | Small Building: 4 m (default) Mid-sized Building: 6 m Big Building: 8 m | Distance to change indication |
| Distance to change floor | Distance (in meters) within which the user is considered to have arrived at the next step in the route, when this step is a floor change. Upon this arrival, the next indication (a floor change instruction) will be shown | Small Building: 5 m (default) Mid-sized Building: 8 m Big Building: 12 m | Distance to change floor |
| Time to first indication | Delay until the first indication shows up. Avoids jumpy indications at startup. | Keep default value (5 s) | Time to return the first indication |
| Distance to ignore indications | If the distance between two indications is lower than this value then the first one will be ignored. | Keep default value (8 m) | |
| Time to ignore unexpected plant changes | Time (in seconds) that Situm waits to re-compute the route when the user goes off-route due to an unexpected floor change (according to the route). | Small Building: 20 s (default) Mid-sized Building: 20 s Big Building: 20 s | Ignoring unexpected floor changes |
The following figure contains an overview of the settings as shown in Situm Mapping Tool:


Calibration settings #
The Calibration Settings screen lets you configure the settings described in the following table:
| Settings | Description | Recommendation | Useful Links |
|---|---|---|---|
| Record WiFi | If enabled, WiFi readings will be recorded during the calibration process. | Depends on the Android version: Android 5, 6, 7, 8: enable it. Android 9: disable it (Android 9 performs WiFi throttling, preventing proper WiFi scanning). Android 10 and above: enable it, but deactivate WiFi throttling first. | Calibrating a building WiFi scan throttling Wifi infrastructure How to calibrate …? |
| Record BLE | If enabled, BLE readings will be recorded during the calibration process. | Enable it only if your building has BLE beacons or access points compatible with the iBeacon standard. | Calibrating a building BLE beacons How t calibrate …? |
The following figure contains an overview of the settings as shown in Situm Mapping Tool:

Crowd Control Settings #
This settings are not currently available in Situm Mapping Tool since 3.83.5 version.
If you enable the Crowd control option, you will have the following options available:
| Settings | Description | Recommendation | Useful Links |
|---|---|---|---|
| Safety distance | Distance (in meters) within which other users will be considered “too close”. | Adjust to the desired distance. Keep in mind that Situm has an average error of 1-3 meters, so distances below 2-5 meters may lead to false positives/negatives. | |
| Max number of people close by | Maximum number of people (not including yourself) that can be within the safety distance. If there are more people than this limit, an alert will be shown. Maximum number of people (not including yourself) that can be inside the same geofence as you. If there are more people than this limit, an alert will be shown. | Adjust to the maximum number of persons you consider tolerable. | |
| Max number of people inside the same geofence | Maximum number of people (not including yourself) that can be inside the same geofence as you. If there are more people than this limit, an alert will be shown. | Adjust to the maximum number of persons you consider tolerable. | |
| Interval for system tray notification | Time (in seconds) between each two consecutive crowd checks. | Keep default value (10 s) |
The following figure contains an overview of the settings as shown in Situm Mapping Tool:

Display and Advanced Settings #
The Display and Advanced Settings screen lets you configure the settings described in the following table:
| Settings | Description | Recommendation | Useful Links |
|---|---|---|---|
| Use account theme | If enabled, the app shows the custom logo and colours that you have configured for your account in Situm Dashboard. Your custom logo & settings will only be shown after you log in. | Enable it only if you want to have a Situm Mapping Tool App with a custom look & feel. | Customizing your organization icons Customizing your organization colors |
| Show geofences over the map | If enabled, geofences will be shown on top of the map on the Positioning and Calibration Screens. | Enable it only if you want to visualize the geofences that you have configured in Situm Dashboard. Otherwise, showing all the geofences may be distracting. | Creating geofences in Situm Dashboard |
| Auto-scale floor plans | If enabled, the app decreases the size of the floorplans to avoid consuming too much memory. | Enable it always. Otherwise, if the floorplans are too heavy, the app may crash in low/mid-end devices due to a high use of memory. | |
| Show sensors info | Show sensor relevant info on top of the screen | Enabled | |
| Revoke data treatment consent | Data treatment consent will be revoked and all the user configurations will be deleted from this device. |
The following figure contains an overview of the settings as shown in Situm Mapping Tool:

Information #
In addition, this Section contains:
| Settings | Description |
|---|---|
| Terms of use | Redirects you to Mobile Application – End User License Agreement |
| Privacy Policy and Legal Notice | Displays Situm’s Privacy Policy and Legal Notice. |
| Phone ID | When Situm stores the geolocations of a smartphone in Situm Platform, each geolocation will be associated to an unique identifier called the “Device Identifier” or “Device ID”. This allows to recover the geolocation history of each device independently. This Device ID will then allow us to assign the device to an user through the MRM web application. |
| Version | App version installed. |
The following figure contains an overview of the settings as shown in Situm Mapping Tool:


