You may access the Configuration screen by selecting the “mechanical wheel icon” in the top bar menu. This screen allows you to manage your building’s positioning-related configurations: the positioning configuration, the positioning model and the calibrations that will be used.
Positioning configuration #
When you calibrate a building, you draw a virtual path that connects all the calibration points. This path contains the points where Situm Mapping Tool has captured the WiFi and/or BLE readings.
Situm Dashboard allows you to modify the aisle calibration width (or path width), which represents the width (in meters) of the virtual paths that you draw when you calibrate. This width has a direct effect on the space that you will cover with each calibration: the wider the path, the farther each calibration point will have influence. A bigger width helps us to cover more area with fewer calibration routes. However, it will have lower accuracy.
In order to change the path width, you have to write the new aisle calibration width and click on the “Update” bottom.
In the following image, you can see an aisle calibration width is well adjusted to the office building corridors.

In the second image, we have narrowed a bit the aisle calibration width. The image shows how the signals don’t cover the complete width of some corridors. Therefore, this would be an incorrect aisle calibration width for this building.

Positioning model #
This is the signal model generated from the calibration files, used by the smartphones to determine the device geolocation. The positioning model contains the WiFi or BLE signals measured in each area of the building.
In order to visualize this signal model, you have to select a certain floor (1) and click on the button “Visualize Model”. (2). You can also check the date and time when the model was generated (3).

You can switch between BLE signal visualization or WIFI signal visualization by clicking on the top bar options, as shown in the following images:


Signal strength scale #
In the previous images, you may notice a colour scale above each floorplan. This scale helps to identify the real signal strength captured in each area of the building: high signal power areas are represented in green and low signal power areas in red, while orange represents a signal power in the middle. Non-coloured areas represent areas that have not been calibrated, and therefore Situm will not work in them.
It is important to take into account the following tips:
- The minimum value (red colour) on the scale, although it represents lower signals, this value is correct as long as it is lower than 85 dB for BLE signal and lower than 95 dB for WiFi signal. If the value is higher than 85 or 95 dB respectively, Android and iOS will not be able to record WiFi and BLE signals appropriately.
- The lower the maximum value is (green colour), the better the accuracy.
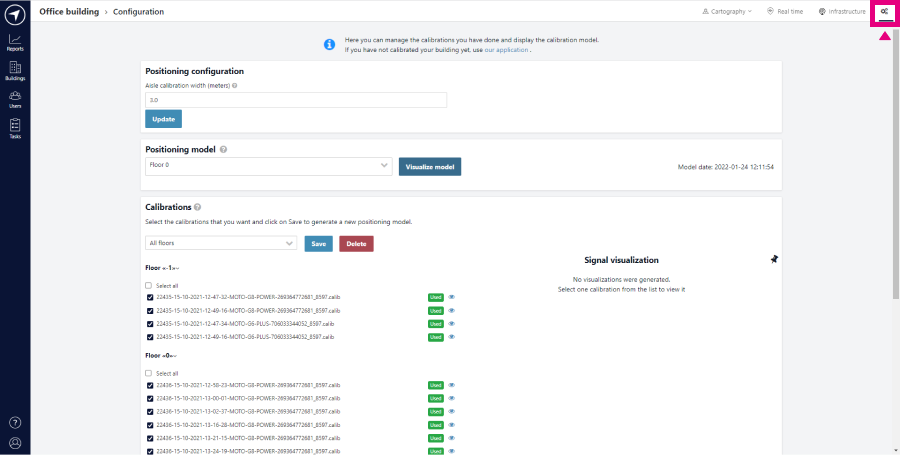
Calibrations #
Calibrations are the files that contain the WiFi and/or BLE signals gathered with the Situm Mapping Tool app, in order to build the positioning model of the building.
The Configuration screen allows you to list all these files, selecting those that you want to use and even deleting some of them. These actions will generate a new positioning model, which may take from a few seconds to a few minutes.
Understanding a calibration file #
Calibration files have a .calib extension. Each part of the file has a different meaning. For example:
22436-15-10-2021-12-58-23-MOTO-G8-POWER-269364772681_8597.calib
- 22436: identifier of the floor where the calibration was performed.
- 15-10-2021: the date when the calibration was performed.
- 12-58-23: the time when the calibration was performed.
- MOTO-G8-POWER: device model used to calibrate.
- 706033344052: identifier of the device used to calibrate.
- 8597: identifier of the building where the calibration was performed.
Calibration files status #
In the calibrations menu, calibration files can have the following status:
- USED: the calibration file has been used to build the positioning model.

- NOT USED: the calibration file has not been used to build the positioning model.

- TRAINING: the positioning model is being built and it’s using each calibration file which has this status.

- TRAIN USED: it means that the positioning model is training and using a calibration which has not been used status before.

Viewing calibrations #
You can view the WiFi, BLE and paths data points captured in each calibration individually or in a group of calibrations in an aggregated way.
You will see a map with a colour overlay. The green colour represents areas with a high density of calibration data points, which increases the quality of the positioning. The red colour indicates a low density of them, hence more calibration points should be gathered in these areas.
Enlarging the signal/paths visualization image #
You can enlarge the signal/paths visualization image to full screen by clicking on it. It will be shown as follows.

Pinning the signal/paths visualization image #
When there is a big amount of calibration files and you want to search for each one individually, it is very useful to pin the image of signal/paths visualization. In order to do this, just click on the pin icon on the right side of the calibrations menu as it is shown on the down image. Afterwards, the image will be visible even if you scroll down.

Viewing each calibration file individually #
In order to view a calibration individually, select it and click on the eye icon on its right.

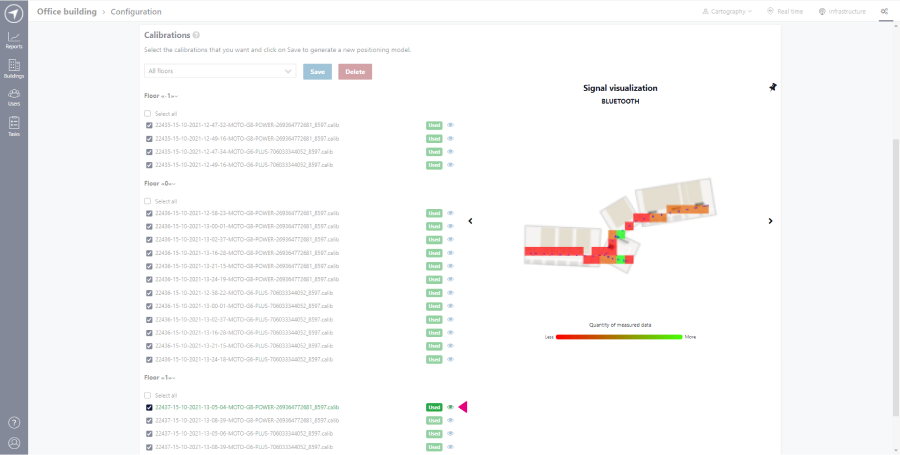

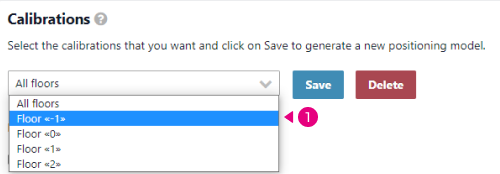
Viewing a group of floor calibrations files #
In order to view a group of floor calibration files, select the floor (1) and click on the visualize button (2). You will see the WiFi and BLE signals visualization and paths visualization for the whole files.

Delete calibrations #
In order to delete a calibration file or a group of them:
- Select the floor where the file or group of files are.
- Check only the file or files you wish to remove.
- Press the Delete button.
- Press the Confirm button on the confirmation message


Filtering hotspots & undesired WiFi MACs #
Sometimes, you will need to filter out some specific WiFi Access Points (or a group of them) in order to achieve good results. You may apply WiFi filters that apply to all your buildings on the My Organization screen.
Hotspots (locally administered MAC addresses) #
Locally administered MAC addresses are often used to create local WiFi networks by devices such as smartphones & printers. One of the most common usages of these addresses are hotspots: devices that provide WiFi to users but that are not standard WiFi Access Points. For example, a smartphone might be sharing WiFi connectivity so other devices near them can connect to the internet. This may affect positioning quality since hotspots tend to move around: you may capture their signals during calibration and generate a signal model, but afterwards, they might move to a different location, completely distorting what would be expected of them.
Most of the time, hotspots are harmless: due to the MAC rotation usually performed by these devices, it’s very difficult that a hotspot that has been captured during the calibration appears again in the future. Anyway, if you suspect that hotspots might be affecting your positioning quality, you may disable them by checking the “Filter locally managed WIFI MAC addresses” in the My Organization screen.

Wifi MAC pattern denylist #
Some WiFi devices might harm positioning accuracy due to several reasons, such as WiFi APs in buses or trains that move around constantly (so the signal maps captured during calibration will never be an accurate depiction of the real signal map). Or maybe there are devices that you know are noisy or just don’t add any benefit to the positioning model (e.g. WiFi APs that don’t exist anymore).
If this is the case, you may filter out specific devices (or groups of them) by introducing them in the “Wifi MAC pattern denylist” in the My Organization screen.


